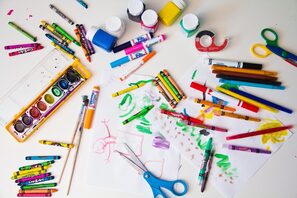
Art Activities For Kids
________________________________________________________________________________
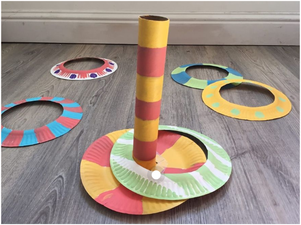
RING TOSS
This is an activity where you can combine art and a game! I found it at kiwico.com. Here are the materials needed:
6 paper plates
1 paper towel tube
Scissors
Paint and a brush (crayons or markers would work too)
Tape or glue
To create this game, follow these steps:
1. Use scissors to cut out a large circle in the center of 5 of the paper plates, making rings.
2. Flip the 5 rings over to the bottom sides. Paint any designs you like. You could also paint one number on each ring such as 5, 10, 15, 20, and 25. Set these aside to dry.
3. Paint the 1 whole plate on the front side and the paper towel tube. Set aside to dry.
4. Tape or glue the paper towel tube to the center of the whole plate to make the pole, see the photo.
5. To play, hold the rings in your hand and stand back from the pole. Toss one ring at a time like a frisbee to try to get it on the pole. If you added numbers to your rings, add the numbers of each ring that made it onto the pole. The person with the highest number wins! If you see that the pole falls over too easily, tape or glue a piece of thick cardboard under the pole plate to make it more sturdy. Have fun!
________________________________________________________________________________
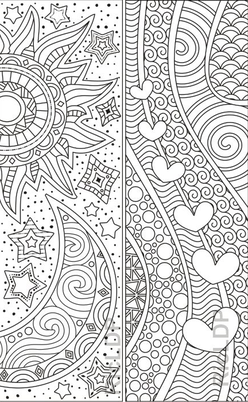
BOOKMARKS
Since I know all of you are doing a lot of reading these days, here are two bookmarks that you can color. I found them here:
http://coloring.jurnalistikonline.com/coloring-mandalas/abstract-design-coloring-bookmarks-coloring-mandalas/
Follow these steps to print out these bookmarks:
1. Click on the link above.
2. Right click on the picture of the bookmarks.
3. Click on copy image.
4. Go to your computer desktop and right click.
5. Click on paste.
6. Right click on the image.
7. Click on print.
You can choose to leave these as one bookmark, just cut them out as one and fold them in half along the center line. Or, you can cut each one out and have two bookmarks. One for you and one for a family member! These would look great colored in with markers. The thin ones might be better since these have some small areas to color. Watercolor paints using a small brush would work, too. Be colorful!
________________________________________________________________________________
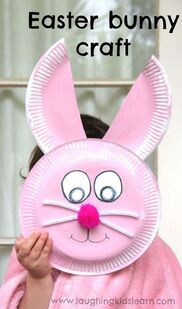
PAPER PLATE EASTER BUNNY
Got 2 paper plates? How about making this giant Easter bunny head? It's easy and you can make changes to certain parts, if you want to. I'll tell you how! Here's what you'll need if you want to make one like the picture:
2 large paper plates
Scissors
Pink paint
Paintbrush
1 piece of white paper
Black marker or black crayon
1 white chenille stem
1 large dark pink pompom
Glue
Let's begin! Follow these steps to make the bunny:
1. Cut 1 of the paper plates in half. Paint the top side of both halves pink. Turn the whole plate upside down and paint it pink too. Let dry. Don't forget to rinse your paintbrush!
2. Glue the 2 painted plate halves under the top edge of the whole plate for ears.
3. Fold the white paper in half. Use the black marker to draw one large oval. Keeping the paper folded, cut out the oval without cutting off the black line. When you're done, you'll have 2 eyes the same size. Draw a black line around the outside edge of the plain oval so the 2 eyes will match. Draw a large circle inside each oval for the pupils. See the photo. Set the eyes aside.
4. Cut the white chenille stem in half. Glue them so they are overlapping in the center of the head plate to make the whiskers.
5. Use the black marker to draw the mouth lines. See the photo.
6. Glue on the eyes.
7. Glue the dark pink pompom over the whiskers. Use a big drop of glue like the size of a quarter. Gently press the pompom into the glue and hold it for a minute or so. Then don't move the bunny until it is completely dry or things might fall off!
Now, I decided to make one of these bunnies for myself, but I didn't have all of the stuff. So, I had to make some changes and you could too, if you don't have everything. I had paper plates, white paper, and a black marker. But no pink paint, chenille stem, or pompom. I did have a watercolor paint tray. Since green is my favorite color, I painted my plates light green. And I brushed a little darker green around the edges. Next, I drew the eyes onto the white paper just like I explained above, except I colored in the pupils. I drew another large oval for the nose and painted it yellow. After the nose was dry, I cut it out. Then, I cut two long, skinny strips of the white paper for the whiskers. I decided to add another strip for a total of three. Finally, I was ready to put everything together. I glued on the ears and waited a few minutes for them to dry. I glued on the eyes, added eyebrows, and drew the mouth. Then, I glued on the nose. After everything was completely dry, I curled the ends of the whiskers by rolling them around a pencil. And that was it! I made my own version of a giant bunny head! Go over to my gallery page and you can see Avocado the bunny. Happy Bunny Day!
________________________________________________________________________________
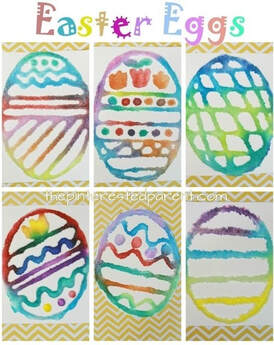
PAINTED SALT EASTER EGGS
Yes, you read the title correctly. This project is made with salt that you paint! It's easy to do, but you will need to be patient and let it dry before moving it. Here's what you'll need:
White paper
Pencil
Washable school glue (in a squeeze bottle)
Salt
Watercolor paints
Paintbrush
Water tub
Time to begin. Follow these steps:
1. Use the pencil to draw a large egg shape onto your paper. Draw details on the inside of your egg such as lines or dots. But, don't draw details too tiny or too close together!
2. Carefully squeeze glue over your pencil lines, but not too thick.
3. While the glue is still wet, sprinkle on salt. I used a lot of salt on mine. I put the salt in a small bowl and used a spoon to sprinkle it over the glue.
4. Now comes the waiting part. I let mine dry about 4 hours. Then, I carefully tilted the paper over the garbage can to let the extra salt fall off.
5. Now comes the fun part. Time to paint. I got a lot of paint on my brush then just touched the tip of the brush to the salt. Don't go back and forth with the brush. Just touch and lift up. Repeat using whatever colors you like. Let dry.
After I was finished with adding paint to the salt, I decided to add some paint to the background. Do you remember where the background area is on a painting? Hop on over to my gallery to see my egg!
________________________________________________________________________________
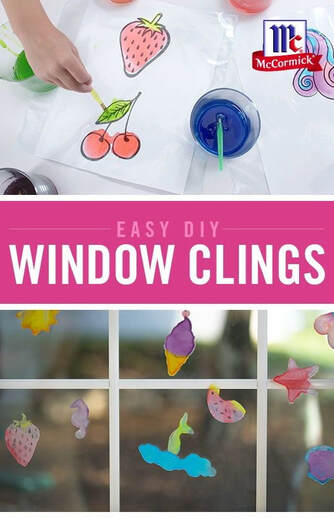
WINDOW CLINGS
McCormick is a company that makes food coloring, a dye used to add color to certain foods like cake frosting. But, food coloring can also be used in art and craft projects, too. Window clings are colorful designs made to stick onto windows, or even mirrors. Let's make one! Here's what you'll need:
Paper
Pencil
Plastic wrap
Tape
2 tablespoons of washable school glue
1/4 teaspoon liquid dish soap
Liquid food coloring (I used ones in small squeeze bottles)
Small disposable cups
Stirring sticks (I used wooden popsicle sticks)
Small paintbrush
Water tub
Paper towel
Follow these steps:
1. Decide what drawing you're going to use for your window cling. You can draw your own design onto the white paper, or you could print a design out from your computer. Just remember, keep the design simple with not a lot of little details. For mine, I drew a happy face sun.
2. Place your drawing some place where it can sit for a long time. I used my dining room table. Place a piece of plastic wrap over your drawing and tape the edges of the wrap down. Now, time for mixing!
3. Decide what colors you'll need. I had only yellow and red food coloring. Pour the glue into one of your cups. Add the dish soap and stir with your stick. Pour some of this mixture into the other cups, one cup for each color.
4. Add 3 to 5 drops of food coloring in each cup. You might want to mix colors, too! I used 5 drops of yellow to make my yellow color, 5 drops of yellow and 1 drop of red to make my orange color, and 4 drops of red to make my red color. Stir really good to mix the food coloring in completely. Next step is the best!
5. Use the paintbrush to paint in your design. Here's some tips: start in the middle of your design and work your way out, don't spread the colors out too thin, rinse your brush in the water tub and dry it on the paper towel often, don't place one color on top of another until the bottom color is completely dry, or they will mix together. Drying takes a long time! Read below for what I did.
6. When your cling is completely dry, very slowly and carefully peel it off the plastic wrap. Place it on a window or mirror and gently press into place. You can take it off and store it on more plastic wrap. Just remember, over time it will lose it's stickiness. That's okay. Then, you can make another one!
I wanted to make my sun with yellow in the middle, orange around the outsides, and red for the face and outlining. So, I started with yellow. I added the orange while the yellow was still wet because I planned on mixing the two colors together anyway. When I finished with the orange, I used a toothpick to swirl the colors together. Then, I placed my red color in a plastic storage bag so it wouldn't dry out while the other colors were drying. I waited all day, about 10 hours, to make sure it was dry. You can tell when it's dry when it's not as shiny anymore. Finally, I was able to add the red face and the outlining. Then I had to wait again. My sun design looks so happy, I named it Shine. Check out my gallery page to meet Shine!
________________________________________________________________________________

DINOSAUR PAPER TOY
Look what I found! It's a dinosaur! I think it looks more like an Allosaurus because it has long arms. Tryannosaurus Rex had very short arms. Want to make one? First you have to do some printing. Here's how. Right click on the parts page here on the left. Then click on save image as. Choose desktop so you can find it easily. Click save. Then go to your desktop and right click on the image. Then click print. Now comes assembling, that means putting it together. You'll need these things:
Dinosaur paper printout
Scissors
Liquid glue
Toothpick
Paper towel (for wiping gluey fingers)
Now here's the steps to assemble your dinosaur:
1. Cut out all of the parts very carefully. Save the small dinosaur image near the top right to look at while you assemble.
2. Make the head first so it can dry. Fold up on all 5 dotted lines ............... and on all 7 white tabs. Begin gluing the back section first. Use the toothpick to apply a tiny amount of glue to the 2 white tabs. Glue the tabs inside the head. Apply glue to the 2 short white tabs on the mouth part then glue these tabs inside the head. Apply glue to the remaining 3 white tabs. Carefully and slowly fit them inside the head. Set the head aside.
3. Now, work on the body. Again, you have 5 dotted lines and 7 white tabs. Fold all of these up. Glue the main body section together. Then glue the two ends in place.
4. Apply glue to the white part of each foot piece. Glue the feet under the body.
5. Apply glue to the top of each arm piece on the white side. Glue the arms to the body. See the image you saved.
6. Fold the green tab on the triangle shaped tail piece. Apply glue to the tab and stick it on the back, at the bottom. See the image.
7. Fold the green tab on each of the 2 spike pieces. Glue 1 piece on the back, right above the tail. Glue the other piece on the white line on the back of the head.
8. This is the last step! Glue the head on top of the body. Let the dinosaur dry completely. You're done!
When I first saw this dinosaur paper toy, I quickly printed one out and began cutting and gluing. Very soon, I realized something wasn't quite right. This dinosaur was so tiny it was hard to put together. But, I continued until it was finished. It was less than 2 inches tall! I knew I had to figure out a way to make all of the parts bigger. I opened the image in my pictures and tried resizing it to be larger. It worked! Now it will be easier for you to make a dinosaur, too! Some of you might still need some help from a family member. Ask them and you'll both have fun! I named my dinosaur Ally and took a photo of it outside in my yard. Go to my gallery page to see!
________________________________________________________________________________
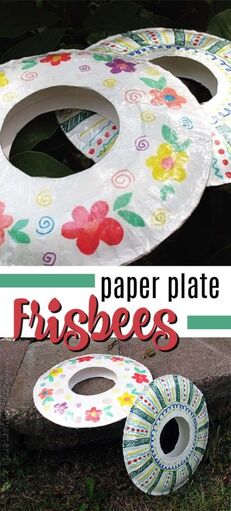
PAPER PLATE FRISBEE
Yes, it's another paper plate project! This one reminded me of playing with a bright orange plastic frisbee when I was a kid. My brother and I used to toss one around. He was really good at making it fly a long way. Me, not so good. Whenever I threw it, the frisbee would usually wind up rolling on the ground like a tire. Oh well, it was still fun! I found this idea on the internet and the instructions called for wrapping the frisbee in that clear, wide packing tape when it was finished. I didn't have much of that kind of tape, so I skipped that part. My frisbee probably won't last as long without the tape, but that's okay. I could always make another one. Here's how I made one:
Materials needed for one frisbee:
2 paper plates (sturdy ones if you have them)
Pencil
Scissors
Glue (strong liquid like Elmer's regular glue)
Watercolor paints, brush, and water tub (or markers)
Paper towels
Steps to make a frisbee:
1. Draw a circle in the center on the back of each plate. I found a small bowl and traced around it.
2. Use the scissors to carefully poke a small hole in the middle of the circle. Some kids may need help with this part. Then, carefully cut both circles out.
3. Paint or use markers to add whatever designs you can think of. I kept mine simple and just painted colorful, wide lines on mine. Let dry.
4. Turn one plate colored side down. Slowly squeeze out a thick line of glue directly on the outer edge of the plate. Place the other plate, colored side up on top of the glued one. Line up the edges of the plates so they're even and use a paper towel to wipe off any glue that squeezes out. Let dry several hours. Go outside and play!
If you're playing frisbee by yourself, you can place a cardboard box, a laundry basket, or such on the ground and try to get the frisbee to fly into it. Or, if yours ends up flying like mine usually did, you can see how far it will roll on the ground! I posted a picture of my frisbee on my gallery page if you want to see it!
________________________________________________________________________________
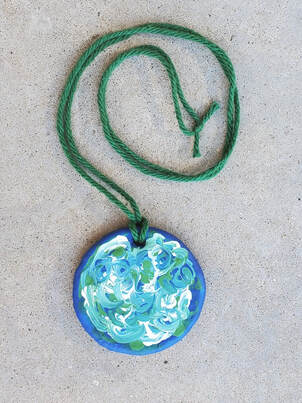
SWIRLED WORLD NECKLACE
I came up with this idea for a necklace that both girls and boys could wear in celebration of Earth Day on April 22. I made some air dry clay using only 2 simple ingredients and without having to bake it in the oven. Instead of trying to paint the continents on my Earth, I just swirled the paint colors together. Swirled World! (it rhymes!) Can you say swirled world 3 times really fast? I couldn't do it. Anyway, back to the necklace. Here's the complete list of materials needed to make 1 necklace:
2 tablespoons cornstarch (it's used in cooking)
1 tablespoon liquid white glue (I used Elmer's original)
Small disposable cup or bowl
Stirring stick (I used a craft stick)
Newspaper or scrap paper
Plastic wrap
Plastic drinking straw
Toothpick
Blue, green, and white acrylic paint (I used craft paint)
Small paintbrush
Water tub
Paper towel
Yarn or string (I used green yarn)
Instructions for making the necklace:
1. Place cornstarch and glue in the small cup. Use the stick to begin stirring. Keep stirring until it forms a lumpy ball. Caution, messy part is next! Do this next part over newspaper.
2. Make sure your hands are clean and dry. Scrape the clay into your hand. You will have to squeeze and roll the ball of clay around in your hands until it is no longer sticky and it forms a smooth ball. This will take several minutes. Just keep squeezing and rolling. You might have to add a little more glue if it seems very dry. I did. You might have to put it down after a couple of minutes to wash and dry your hands to get the sticky bits off. I had to. Then, pick the clay up and go back to work. Soon, it will come together and be smooth. Roll it into a round ball. Wash and dry your hands again.
3. Place the ball of clay on top of plastic wrap. Place more wrap on top of the ball. Use your fingers to gently flatten the clay slightly. Continue using your fingers to flatten the clay to a circle shape about 1/4 inch thick, or do what I did. I found a small drinking glass with a flat bottom. I placed the glass on top of the clay and gently pressed down until the clay was about 1/4 inch thick.
4. Carefully peel off the top layer of plastic wrap. Use the straw to poke a hole near the top edge. You might need a toothpick to clear the clay out of the hole. I did.
5. Now comes the hard part, the waiting. The clay will have to dry at least 8 hours. After 4 hours, carefully flip the clay over and peel off the bottom plastic wrap. Continue drying for another 4 hours or until it feels hard when you touch it.
6. Painting time! Begin by painting the back, the outside edge, and inside the hole of the circle with your choice of the colors. I used blue. Let these parts dry. To make the swirled look, I placed dots of blue, green, and white paint all over the front side of my circle. Then, I used a clean brush and a looping movement to swirl the colors. Be careful swirling! If you swirl too much, you will end up with just one color instead of a mix of blended colors. Let dry completely.
7. Cut a long piece of yarn or string and fold it in half. Push the folded end through the hole in the circle. Pull the yarn through the hole until you have a big loop. Open the loop and pull both ends of the yarn through the loop. Keep pulling the ends until the loop tightens (gently!) against the top of the circle. Place the ends of the yarn around your neck and tie them into a knot, checking to see if the length of the necklace seems right to you.
If you want to wear your necklace on Earth Day, you'll make to make it the day before and you'll have to start it in the morning. What date would that be? (hint: read the first paragraph of this project!)
________________________________________________________________________________
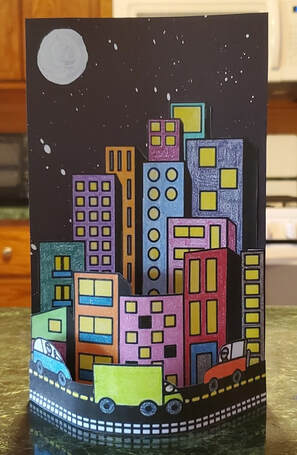
3D CITY
Do you know what 3D means? 3D stands for 3 dimensional, which is an art object that you can see from all sides, the front, the back, the right side, and the left side. A 3D artwork is not flat, like a drawing or a painting. Instead, it stands up. Like this 3D city. Want to make one? It's easy! First, the materials list. To make one like this, you'll need:
City printout
Colored pencils (or markers or crayons)
Scissors
5"x8" black paper (no black paper? color white paper black!)
White paint (optional, I used acrylic)
Small paintbrush
Glue
Here's the how-to:
1. Right click on the city printout (see below). Click save image as. Name it city and save it to your computer. I saved mine to my desktop so I could fine it easier. Then, print it out. Color in all 3 sections with colored pencils or other.
2. Carefully cut each section out. Set these aside.
3. Turn the black paper to the tall position and place it onto some newspaper. If using the white paint, thin it with a little water. Dip the paintbrush in then tap the brush on the end of your finger to splatter the paint onto the black paper. Paint a circle in the top left corner for a full moon or maybe try a crescent moon. Let dry. Wash your paintbrush right away if using acrylic paint.
4. Apply glue (easy on that glue!) to the back of the tallest city section. Glue this section so the bottom edge of this section touches the bottom edge of the black paper.
5. Bend the 2 white tabs on the sides of the shorter city section to the back. Apply a small amount of glue to the outside edge of the tabs. Glue this section so the bottom edge lines up with the first section. This shorter section will curve out away from the first section. (see picture below)
6. Bend the 2 white tabs on the sides of the road section to the back. Apply a small amount of glue to the inside edge of the tabs. Glue this section so the bottom edge lines up with the other 2 and the tabs are glued to the back of the black paper. (see picture below) Let dry.
7. Check to see if the city stands up without falling over. Mine kept tipping over to the back. So, I cut an extra piece of black paper in a 2 1/2"x3" rectangle. I folded the rectangle in half and glued it to the back of my city to make a stand. (see picture)
All done! This was a fun project and was made using simple materials. Why don't you try making one? What would you name your city? I think I'll call mine Laurieville, after me!
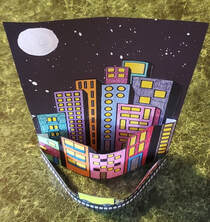
This view of the city is looking down from the top. You can see how the shorter city section is glued right at the edges of the taller section. And, you can see how the shorter section curves out away from the taller one. You have to get the bottom edges of these 2 sections even or it probably won't stand up correctly.
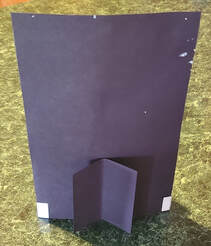
This view is the back of the city. You can see how the tabs on the road section are glued to the back. Also, you can see how I glued the stand to the back. Yours may not need a stand.

This printout came from a website called krokotak.com. They offer a lot of kids activities including printables. See my websites page for more information on krokotak. Remember, to print this out you first have to save it to your computer then print. You only need this one page to make the 3D city.
________________________________________________________________________________
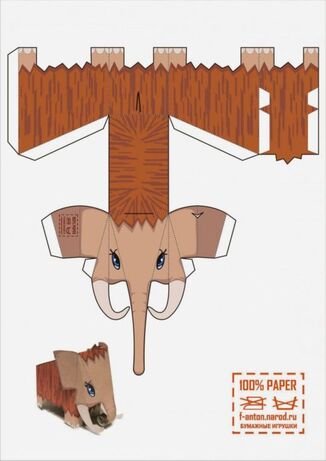
MAMMOTH PAPER TOY
Look, another printable paper toy! Mammoths became extinct about 4,000 years ago. Do you know what extinct means? That means there aren't any more alive today. That's sad! But, a relative of the mammoth is very much alive today. I bet you know what animal I'm talking about! You're right, it's the elephant. How about making this paper toy in remembrance of the woolly mammoth? By the way, why were mammoths called woolly? Because of their thick strands of hair, which looked like sheep's wool, only much longer. To begin this activity, you'll have to print out this page here on the left. Right click on the page, select save image as, and then save it somewhere on your computer. I saved it to my desktop, so I could find it easier. Print out 1 copy. Find these other materials:
Scissors (try to find small scissors with pointed tips)
Glue (I used liquid glue and a toothpick to apply it so I could use tiny amounts at a time)
Ready? Let's talk about the cutting out of this mammoth. You can see that the toy is in one piece and there's a lot of short lines to cut. You might need some help and the gluing because there weren't any written instructions. I just had to see what part goes where before gluing it in place. I also looked at the picture in the corner while I worked. I began by doing all of the folding on the dotted lines. Then, I started forming the body by gluing the white tabs in place. Remember, hold parts in place to see if it looks right before applying glue. At first, I didn't understand what that tiny white triangle on that one ear was for. See it? Then, I figured it out. After that ear is folded, cut that tiny piece out. It's supposed to be a tear in the ear. Mammoths had huge ears, but the skin on them wasn't really thick. So, when their ear would catch on something, like a tree branch, it would tear. Poor mammoth! That happens to elephants, too. Next time you see an elephant on tv, look to see if they have tears in their ears. Then you can say, poor elephant! Click on over to my gallery page to see my mammoth, Molly. She's climbing around on some rocks.
________________________________________________________________________________
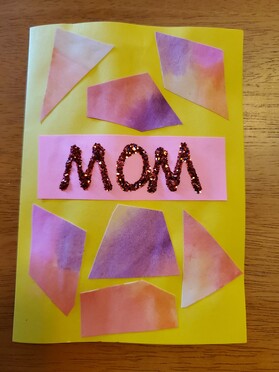
MOM CARD
Mom's special day is coming soon! Do you have an idea in mind for making Mother's Day delightful for your special mom? A Mother's Day card is always a great choice and they're easy to make with materials you probably have around your house. Mother's Day has been a national holiday since 1914, and during the early 1920's, companies like Hallmark have been making cards to help people celebrate this day to honor mothers everywhere. This card I've shown here has some pieces of painted paper glued to the front and a big, glittery Mom.
Mom's special day is coming soon! Do you have an idea in mind for making Mother's Day delightful for your special mom? A Mother's Day card is always a great choice and they're easy to make with materials you probably have around your house. Mother's Day has been a national holiday since 1914, and during the early 1920's, companies like Hallmark have been making cards to help people celebrate this day to honor mothers everywhere. This card I've shown here has some pieces of painted paper glued to the front and a big, glittery Mom.
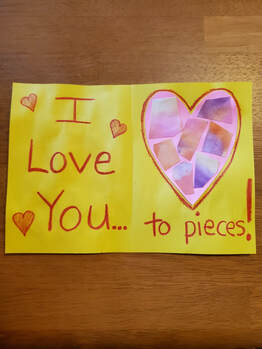
The inside reads, "I love you to pieces!" with a pink paper heart filled with more pieces of painted paper. I thought about putting some glitter on the inside of the card too, but decided not to because it might get rubbed off when opening and closing the card. It's okay if you don't have any glitter. And, if you don't have paint to make the painted paper, you could just color some white paper with markers or crayons instead. However you make it, I'm sure your Mom will love getting a homemade card from you on Mother's Day!
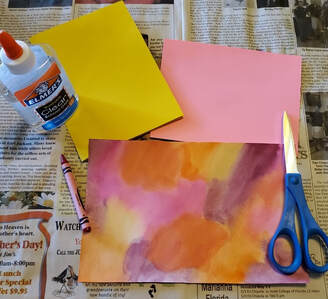
Here are the materials I used:
1 sheet of yellow paper, folded in half
1/2 sheet of pink paper
1/2 sheet of painted paper, (I used watercolor paints)
Scissors
Glue
Red crayon
Red glitter (it looks pink in the photo above)
To begin the card, I first painted the paper with pink, red, orange, and purple colors and let it dry. Then I cut the painted paper into pieces. I only used half of the painted paper, so I'm saving the other half for later. Next, I cut a strip off the pink paper and glued it to the front of the yellow (see photo above). Then I glued some painted pieces on the front. Next, came the inside. I cut a heart shape from the pink paper, glued it on the right side, then glued some painted pieces inside the heart. I used the red crayon to write the words, draw some little hearts, and outlined the pink heart. Finally, on the front I wrote Mom with the crayon, outlined the letters with glue, and sprinkled them with glitter. All done! Time to let it dry. Happy Mother's Day to your mom!
________________________________________________________________________________
TISSUE PAPER DRAWING
I thought this project was really interesting because I liked the idea of drawing on top of tissue paper. You have to brush a layer of glue mixture on top of the tissue so it will stick. I wasn't sure how well the marker would work when drawing, but it was easy! In this example of the project, I liked the idea of the flowers and the bugs. The colors of the tissue for the background was a good choice because they're bright and not too dark. I don't think the drawing would show up as well on darker colors of tissue paper. Can you think of some dark colors? How about black or brown or dark purple? Ready to gather the materials? Here's what you'll need:
Thick paper for background (I used a piece of cardboard)
Tissue paper in desired colors
Scissors
Glue mixture-in a small bowl mix 2 parts white school glue and 1 part water (I used 2 tablespoons glue and 1 tablespoon of water)
Large, flat paintbrush
Black permanent marker (I used a Sharpie)
Let's start.
1. Cut the tissue paper into large pieces. Squares or rectangles would be good.
2. Get your glue mixture ready.
3. Brush glue mixture onto a small area of your thick paper. Place a piece of tissue on top. Then brush a layer of glue mixture on top of the tissue making sure the entire piece of tissue is covered.
4. Continue gluing on tissue pieces, overlapping them so the entire paper is covered. Remember, to brush glue mixture on top of each piece. Let dry completely. How do you know when it's dry? It's not sticky when you lightly touch it.
5. Use the black marker to draw whatever designs you like. Done!
I decided to do my project a little differently. I placed certain colors of tissue paper in certain places in my background. Medium blue at the top and light blue the rest of the way down. I let this dry. Then, I added white rectangles in 3 circle shapes ( I had to do 2 layers of the white to make that color show up better). And, I added some bumpy white shapes in the medium blue area. I also added medium green shapes, yellow on top of the white circles, a yellow circle with small rectangles poking out of it, and light green at the bottom. As a last idea, I added a large orange circle on top of one leaf. When everything was dry, I drew daisies, grass, clouds, a sun, and I turned that orange circle into a ladybug. Click over to my gallery page to see my Daisy Drawing!
________________________________________________________________________________
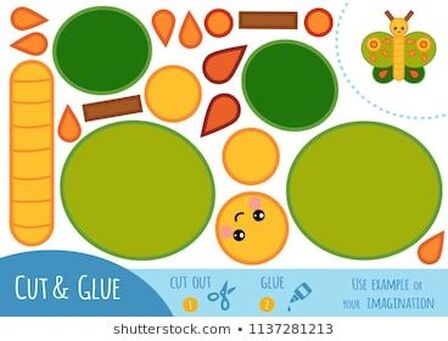
BUTTERFLY
I found this cut-and-glue butterfly while searching for some easy paper projects on the internet. I liked how well the colors went together. And, all you need are scissors and glue. Butterflies are so colorful! They come in almost any color you can think of like red and pink and orange, and lots of other colors, too. Did you know there are turquoise blue butterflies? Let's make a butterfly! First, you will need this page printed out. Here's how: right click on the picture and choose save as. Paste it onto your desktop on your computer. Then, right click on it and choose print. The shapes will probably be a little fuzzy looking when you print it out, but I kinda liked that look so it didn't bother me. Next, carefully cut all of the pieces out. Don't forget that orange teardrop shape close to the bottom right corner (I almost did!). Keep the picture of the butterfly in the top right corner so you can look at it while you are putting everything together. Here's the steps I followed:
1. Glue the 2 light green circles so they are slightly overlapping in the middle.
2. Glue the 2 dark green circles in the same way.
3. Glue the tops of the dark green circles under the light green ones.
4. Glue the body on top in the center of the circles.
5. Glue the head on top of the body.
6. Glue the antenna under the top of the head.
7. Glue (lots of gluing, huh?) the designs on the wings.
That's it! Just cutting and gluing on this project. Now you have a beautiful butterfly. I decided to change my butterfly just a bit. Those pink cheeks on the face made me think of a girl butterfly. So, I added eyelashes using a black ink pen. Then, I got to thinking about how this butterfly would make a fun stick puppet. So, I taped a skinny stick to the back after I had glued everything together. Well, then I had to give her a name. So, I decided to call her Emerald because the dark green color on her wings reminded me of the gemstone known as emerald. Fly on over to my gallery page to see her!
