How-To Drawing for Kids
________________________________________________________________________________
ANGELFISH
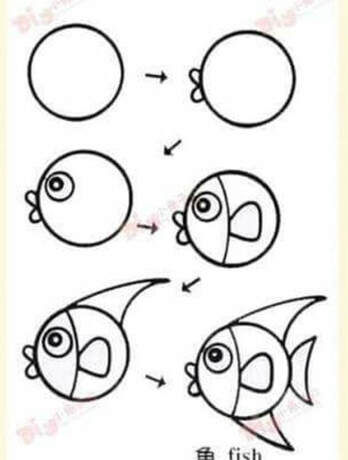
Want to try drawing an angelfish? First, get some paper and a pencil. Look at the picture and follow the arrows. Draw a large circle in the middle of the paper. Need help drawing? Try finding something around your home to trace, like the lid from a plastic container. Next, draw the mouth. If you turn your head sideways the mouth looks like the top of a heart shape. Then draw the eye. Make it big! Next comes the curved line on the body and the swimming fin. Now, draw those long top and bottom fins. Those look a little like triangles. Finally, draw the tail. And you're done! Fish need friends, too! You could add another fish to your drawing. Your picture would look "fin-tastick" colored in with crayons or markers. Don't forget to add water!
Want to try drawing an angelfish? First, get some paper and a pencil. Look at the picture and follow the arrows. Draw a large circle in the middle of the paper. Need help drawing? Try finding something around your home to trace, like the lid from a plastic container. Next, draw the mouth. If you turn your head sideways the mouth looks like the top of a heart shape. Then draw the eye. Make it big! Next comes the curved line on the body and the swimming fin. Now, draw those long top and bottom fins. Those look a little like triangles. Finally, draw the tail. And you're done! Fish need friends, too! You could add another fish to your drawing. Your picture would look "fin-tastick" colored in with crayons or markers. Don't forget to add water!
________________________________________________________________________________
EASTER BUNNY
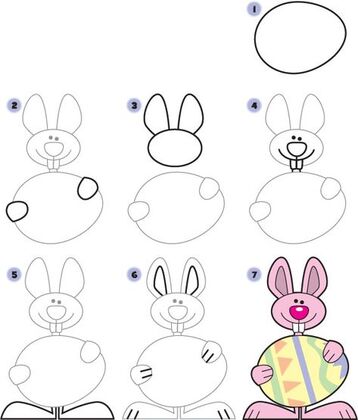
Look at this cute bunny! His Easter egg is so huge, it's hiding his body! Quick, find some paper and a pencil and let's draw him! Find the number 1 on the left. You will need to draw a really big egg shape on your paper. Number 2, draw the two front paws. See how none of his arms are showing, only the paws. Number 3, draw an oval for his head then add the ears. Number 4, make that cute face with the large nose, mouth with teeth sticking out, and dots for eyes. Don't forget the two short neck lines under the teeth. Number 5, draw those giant feet! Number 6, add toe lines, paw lines, and the inner ears. You could also add designs on the egg. Number 7 at last, add color! Colored pencils or crayons would look good on him. Easter colors are often pastel, meaning lighter colors like pink, yellow, light blue, and light green. Also, lavender. Do you know what lavender looks like? If you don't know, look it up on the internet, or ask someone at home! Happy Easter!
Look at this cute bunny! His Easter egg is so huge, it's hiding his body! Quick, find some paper and a pencil and let's draw him! Find the number 1 on the left. You will need to draw a really big egg shape on your paper. Number 2, draw the two front paws. See how none of his arms are showing, only the paws. Number 3, draw an oval for his head then add the ears. Number 4, make that cute face with the large nose, mouth with teeth sticking out, and dots for eyes. Don't forget the two short neck lines under the teeth. Number 5, draw those giant feet! Number 6, add toe lines, paw lines, and the inner ears. You could also add designs on the egg. Number 7 at last, add color! Colored pencils or crayons would look good on him. Easter colors are often pastel, meaning lighter colors like pink, yellow, light blue, and light green. Also, lavender. Do you know what lavender looks like? If you don't know, look it up on the internet, or ask someone at home! Happy Easter!
________________________________________________________________________________
UNICORN
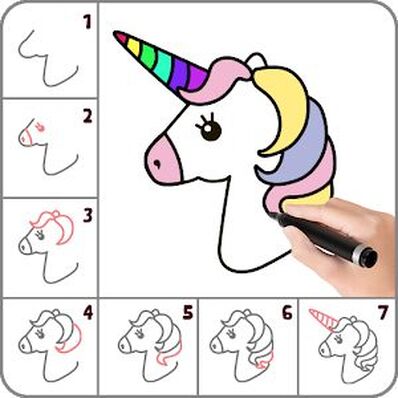
I know a lot of girls who like unicorns, so this one is for you! Do you know what the "uni" in unicorn means? It means one. The unicorn got its name because it has one horn. Grab some paper, a pencil, and a black marker or a black crayon. look at box 1 on the left. See where the gray line begins, not in the middle of the paper, but a little closer to the top. Use your pencil to draw the same line as best as you can. Draw lightly in case you have to erase. You might have to practice drawing this part before you like the way it looks. Next, look at box 2. The lines and shape you see in pink are what you draw now. Keep on going to the next boxes in order and drawing the parts in pink. Check your work. Do you want to change anything? Now it's time for the black marker so you can outline. Do you remember what it means to outline? It means to trace over every line. When you finish with the black marker, you can color in your unicorn. It would look grand with bright colors! Markers would be an outstanding choice!
I know a lot of girls who like unicorns, so this one is for you! Do you know what the "uni" in unicorn means? It means one. The unicorn got its name because it has one horn. Grab some paper, a pencil, and a black marker or a black crayon. look at box 1 on the left. See where the gray line begins, not in the middle of the paper, but a little closer to the top. Use your pencil to draw the same line as best as you can. Draw lightly in case you have to erase. You might have to practice drawing this part before you like the way it looks. Next, look at box 2. The lines and shape you see in pink are what you draw now. Keep on going to the next boxes in order and drawing the parts in pink. Check your work. Do you want to change anything? Now it's time for the black marker so you can outline. Do you remember what it means to outline? It means to trace over every line. When you finish with the black marker, you can color in your unicorn. It would look grand with bright colors! Markers would be an outstanding choice!
________________________________________________________________________________
KAWAII DONUT
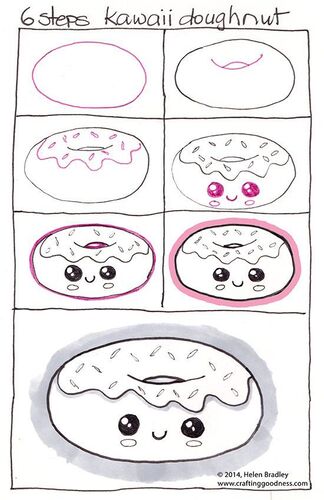
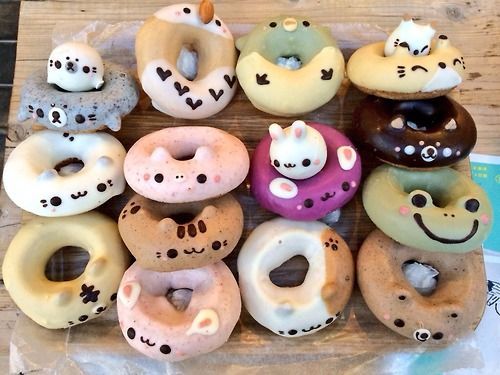
Do you know what drawing in kawaii style looks like? Kawaii is a Japanese word meaning cute. So, to draw in kawaii style, you decide on an object and add a cute face that doesn't have a lot of details to it. Take a look at the donut. For the face, all you see are eyes with ovals under them (cheeks, maybe?) and a little mouth. Kawaii can be people, animals, or even food. Try drawing a cute donut in kawaii style! Where to begin? Start with the top box on the left. Draw a large horizontal oval. Do you remember which way a horizontal line or shape goes? Side to side! Next, look at the 2 curved lines in the middle of the oval. The one on the bottom is longer. Draw those 2 lines. Now for the frosting. Look on the left side of the oval for the beginning of the wavy line. Wavy lines go up and down. Draw one all the way to the right side of the oval. You could add sprinkles, if you want, by drawing tiny, skinny rectangles. It's a donut! Here's the kawaii part. Add 2 large eyes under the frosting line. You can draw the eyes anyway that you want. Then add a little smile. This donut needs some color. Pink or yellow frosting? Blue or red sprinkles? Light brown or dark brown donut? You choose! Soft colors would look good on this. Colored pencils or crayons would do the job! Look below at this picture I found. Real kawaii donuts! They were actually made at a bakery in Japan. Cute, huh?! I like the one that looks like a frog!
Do you know what drawing in kawaii style looks like? Kawaii is a Japanese word meaning cute. So, to draw in kawaii style, you decide on an object and add a cute face that doesn't have a lot of details to it. Take a look at the donut. For the face, all you see are eyes with ovals under them (cheeks, maybe?) and a little mouth. Kawaii can be people, animals, or even food. Try drawing a cute donut in kawaii style! Where to begin? Start with the top box on the left. Draw a large horizontal oval. Do you remember which way a horizontal line or shape goes? Side to side! Next, look at the 2 curved lines in the middle of the oval. The one on the bottom is longer. Draw those 2 lines. Now for the frosting. Look on the left side of the oval for the beginning of the wavy line. Wavy lines go up and down. Draw one all the way to the right side of the oval. You could add sprinkles, if you want, by drawing tiny, skinny rectangles. It's a donut! Here's the kawaii part. Add 2 large eyes under the frosting line. You can draw the eyes anyway that you want. Then add a little smile. This donut needs some color. Pink or yellow frosting? Blue or red sprinkles? Light brown or dark brown donut? You choose! Soft colors would look good on this. Colored pencils or crayons would do the job! Look below at this picture I found. Real kawaii donuts! They were actually made at a bakery in Japan. Cute, huh?! I like the one that looks like a frog!
________________________________________________________________________________
LADYBUG
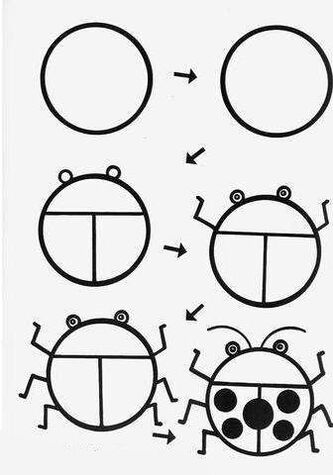
It's ladybug season! Did you know a ladybug is a kind of beetle? Ladybugs are really helpful to farmers and gardeners. They eat lots of little bugs that like to chew on plants. Some people think ladybugs are just red and black. But they can be orange, yellow, gray, brown, and even pink! There is a blue ladybug that lives in Australia. Let's draw a ladybug! Look to the left at the top. Start with a circle. Your circle can be small or large. Now follow the arrows. Next, draw the vertical and the horizontal lines in the middle of your circle. Do you remember which one is the vertical line? Here's a hint: vertical lines go up and down. Then draw 2 small circles on the top for the eyes. Look at the next picture to see how to begin drawing the top 2 legs. See how the leg is made using 3 short diagonal lines. Remember, diagonal lines are slanted like the letter x. Don't forget to add the dots inside the eyes. The next picture shows 4 more legs because ladybugs have 6 all together. Now the last picture. Big black dots and antenna. You can decide how many black dots to draw on your ladybug. Some ladybugs have just a few dots and some have a whole lot. Also, you can draw the antenna however you want them to look. Straight or curved or with little circles on the ends, it's up to you. What do ladybugs use their antenna for? They smell, taste, and feel things using their antenna. Weird, huh?! Don't forget to color in your ladybug. Paint or crayons would look great. Maybe even add a giant leaf or a flower so it looks like your ladybug is sitting on it.
It's ladybug season! Did you know a ladybug is a kind of beetle? Ladybugs are really helpful to farmers and gardeners. They eat lots of little bugs that like to chew on plants. Some people think ladybugs are just red and black. But they can be orange, yellow, gray, brown, and even pink! There is a blue ladybug that lives in Australia. Let's draw a ladybug! Look to the left at the top. Start with a circle. Your circle can be small or large. Now follow the arrows. Next, draw the vertical and the horizontal lines in the middle of your circle. Do you remember which one is the vertical line? Here's a hint: vertical lines go up and down. Then draw 2 small circles on the top for the eyes. Look at the next picture to see how to begin drawing the top 2 legs. See how the leg is made using 3 short diagonal lines. Remember, diagonal lines are slanted like the letter x. Don't forget to add the dots inside the eyes. The next picture shows 4 more legs because ladybugs have 6 all together. Now the last picture. Big black dots and antenna. You can decide how many black dots to draw on your ladybug. Some ladybugs have just a few dots and some have a whole lot. Also, you can draw the antenna however you want them to look. Straight or curved or with little circles on the ends, it's up to you. What do ladybugs use their antenna for? They smell, taste, and feel things using their antenna. Weird, huh?! Don't forget to color in your ladybug. Paint or crayons would look great. Maybe even add a giant leaf or a flower so it looks like your ladybug is sitting on it.
________________________________________________________________________________
EARTH DAY POSTER
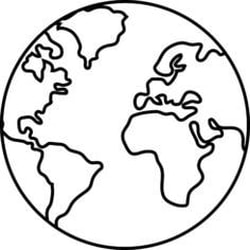
Earth Day is on April 22. Every year on this day people celebrate this amazing planet we live on by thinking of ways to protect it. Safe environments and clean water are extremely important for all living things. You could create a poster about Earth Day by printing out the world drawing on the left. Just right click on the world, click save image as, name it world, and download it to your computer. I chose to place it on my desktop so I could easily find it later. You should have enough room left on your printout that you could add drawings of your own. Some suggestions could be people, plants, and animals that you think are important. Or, you could add a saying such as:
Keep Our Planet Safe!
I Love This World!
Remember Earth Day!
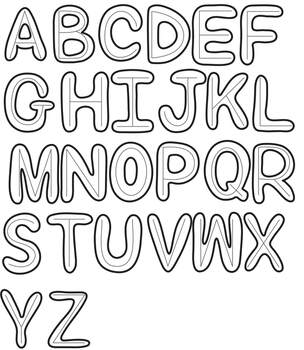
Can you think of a different saying about Earth Day? Whenever you're creating a poster, words that have super thick lines on them, like block or bubble letters, look excellent because they stand out. An easy way to draw block letters is by first using a pencil to draw the letter like you usually do. But, draw lightly! Then, lightly draw around the letter. Look at the example below. See the thin lines on the inside of the letters. After you finish drawing around the outsides, go back and erase the thin ones on the insides. Outline your letters with a dark color then color them in. I like to add a variety of words on my posters, some thick and some thin, some all upper case and some all lower case. Also, I like to do the most important words in bright colors, so they will be noticed right away when someone sees my poster. Happy Earth Day!
Earth Day is on April 22. Every year on this day people celebrate this amazing planet we live on by thinking of ways to protect it. Safe environments and clean water are extremely important for all living things. You could create a poster about Earth Day by printing out the world drawing on the left. Just right click on the world, click save image as, name it world, and download it to your computer. I chose to place it on my desktop so I could easily find it later. You should have enough room left on your printout that you could add drawings of your own. Some suggestions could be people, plants, and animals that you think are important. Or, you could add a saying such as:
Keep Our Planet Safe!
I Love This World!
Remember Earth Day!
Can you think of a different saying about Earth Day? Whenever you're creating a poster, words that have super thick lines on them, like block or bubble letters, look excellent because they stand out. An easy way to draw block letters is by first using a pencil to draw the letter like you usually do. But, draw lightly! Then, lightly draw around the letter. Look at the example below. See the thin lines on the inside of the letters. After you finish drawing around the outsides, go back and erase the thin ones on the insides. Outline your letters with a dark color then color them in. I like to add a variety of words on my posters, some thick and some thin, some all upper case and some all lower case. Also, I like to do the most important words in bright colors, so they will be noticed right away when someone sees my poster. Happy Earth Day!
________________________________________________________________________________
LION
I saw this project on a really awesome website for kids called krokotak. If you go to my websites page, I'll tell you all about it. Anyway, I was looking around the website and saw this lion. Is this a male lion or a female lion? How do you know? This project doesn't require many materials and it offers some practice for cutting with scissors. Got a piece of paper and a pencil? How about a black marker, crayons, and of course, scissors. Scroll down to the next picture and let's begin!
I saw this project on a really awesome website for kids called krokotak. If you go to my websites page, I'll tell you all about it. Anyway, I was looking around the website and saw this lion. Is this a male lion or a female lion? How do you know? This project doesn't require many materials and it offers some practice for cutting with scissors. Got a piece of paper and a pencil? How about a black marker, crayons, and of course, scissors. Scroll down to the next picture and let's begin!
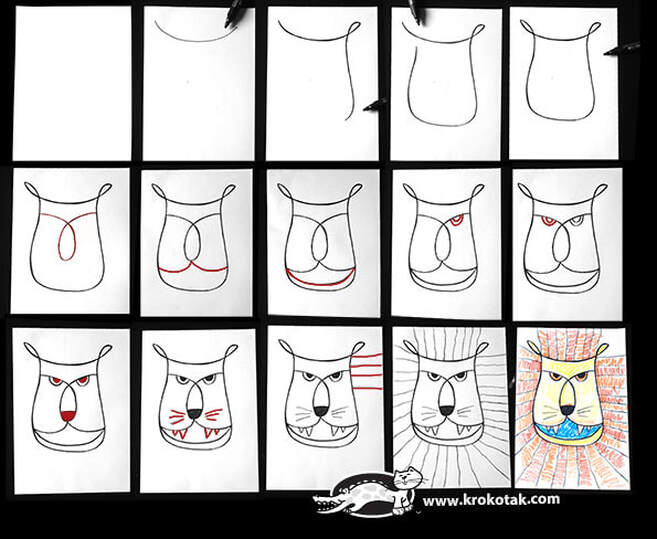
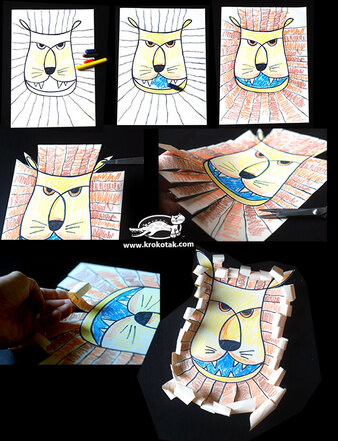
Look at the top picture on the left. What paper position is shown? You're right, it's vertical! Next picture. See how the curved line is not too close to the top of the paper. Picture 3 shows a loop for the right ear then a slightly curving line to make the side of the head. Picture 4 shows the bottom of the head and then up the other side. Continue looking at the pictures in order and drawing the lines shown in red. You can make any changes you want to your drawing to make it look different from what is shown here. It's up to you! Take a look at picture 14. See how there are no lines in the corners by the ears? That's because those sections will be cut off. See the picture showing the project above this one. After you finish drawing with your pencil go back and outline using a black marker. Remember outlining? That means to trace over the pencil lines. Next, do all of the coloring in using crayons. Or, you could use colored pencils or even watercolor paints. Then, start cutting on the lines around the head. Be extra careful around those ears! I didn't cut all the way down on the lines right next to the ears so they would be less likely to fall off. The last thing to do is to curl up the mane. You can use your fingers like the picture shows, or you can roll each strip around a pencil to curl them. I named the lion I made Leonardo. Go to my gallery page and read to find out why I named him that.
________________________________________________________________________________
FAMILY HOUSE
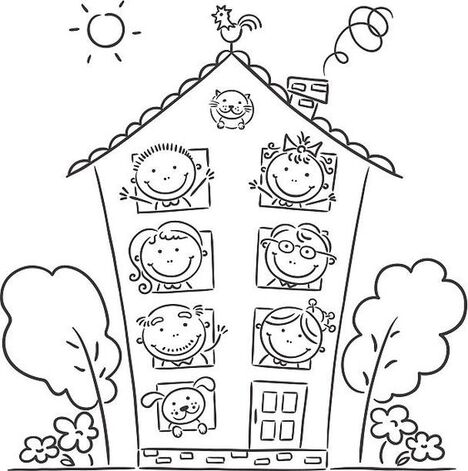
The first thing I noticed about this house drawing was how the people and animals looked like they were sticking their heads out of the windows. The next thing I noticed was the whole family was shown. There's Grandma and Grandpa, Mom and Dad, sister and brother, cat and dog. How do you know which ones are supposed to be Grandma and Grandpa? Their hairstyles! Grandma is wearing her hair up in a bun with pins sticking out and Grandpa is bald with only a little hair left on the sides! If you want to draw a house like this one, you'll need to make it very tall, especially if you're going to add a window for everyone in your family! So, start with the house. When you get to the roof, you can add the chimney and the chicken. A chicken?! That's not supposed to be a real chicken on top of the house. It's a weathervane. Do you know what a weathervane is? It's a device for telling which way the wind is blowing. Real weathervanes have a large arrow with some type of figure on it, a rooster was very common. And, it has the 4 directions on it. You know, north, south, east, and west. The weathervane can spin around in the wind and will point in the direction the wind is blowing from. For example, if the wind is blowing from the west, the rooster will point to the east. Weathervanes are old-timey and not many houses have them anymore. Anyway, after you draw your house add a door and windows. Draw you and your family in the windows. Then, add some trees and flowers or whatever you like outside. Don't forget to color in! Crayons would look colorful!
The first thing I noticed about this house drawing was how the people and animals looked like they were sticking their heads out of the windows. The next thing I noticed was the whole family was shown. There's Grandma and Grandpa, Mom and Dad, sister and brother, cat and dog. How do you know which ones are supposed to be Grandma and Grandpa? Their hairstyles! Grandma is wearing her hair up in a bun with pins sticking out and Grandpa is bald with only a little hair left on the sides! If you want to draw a house like this one, you'll need to make it very tall, especially if you're going to add a window for everyone in your family! So, start with the house. When you get to the roof, you can add the chimney and the chicken. A chicken?! That's not supposed to be a real chicken on top of the house. It's a weathervane. Do you know what a weathervane is? It's a device for telling which way the wind is blowing. Real weathervanes have a large arrow with some type of figure on it, a rooster was very common. And, it has the 4 directions on it. You know, north, south, east, and west. The weathervane can spin around in the wind and will point in the direction the wind is blowing from. For example, if the wind is blowing from the west, the rooster will point to the east. Weathervanes are old-timey and not many houses have them anymore. Anyway, after you draw your house add a door and windows. Draw you and your family in the windows. Then, add some trees and flowers or whatever you like outside. Don't forget to color in! Crayons would look colorful!
________________________________________________________________________________
MAMA LLAMA
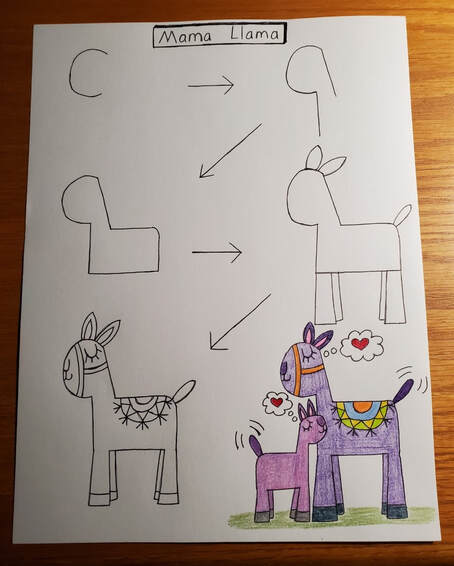
I created this step-by-step drawing tutorial in honor of Mother's Day, which will be on May 10, 2020. Llamas are popular right now. I've seen them on t-shirts, backpacks, and lunch boxes. Did you know llamas and camels are in the same family? It's like they're cousins. Llamas live in South America where some are wild and some live with people. So, if you're into llamas, here's an easy type to draw. Let's get busy drawing! Grab some paper and a pencil. Look in the top left corner on my paper. There's a curved line that looks like a letter C. Draw that. Follow the arrow to the right. Draw these 2 straight lines for the neck. 1 line is a diagonal (remember? diagonals are slanted) and the other is a vertical (remember? up and down). Follow the arrow. Draw the lines for the rest of the body. Another arrow to the right. Now, draw the ears, tail, and legs. Last arrow. Finally, add the details: inner ear lines, closed eye with lashes, nose and mouth lines, halter (that what some llamas wear on their head, like a horse does), hoof lines, and a fancy blanket (some camels wear blankets, too). Now you can add other details if you want. Since this was a Mother's Day idea, I drew a baby llama. Look, do you see those short, curved lines by their tails? Those are called action lines and they show that the 2 llamas are wagging their tails. Cute, huh? Also, I drew thought bubbles. Those are the cloud shapes by their heads. See the small circles going towards their heads? Those show what the llamas are thinking of. I'm sure you know what the hearts inside the bubbles mean! I used colored pencils on my llamas, but you could use crayons or markers instead. Happy Mama Llama Day! Hey, that rhymes! Mama Llama...Mama Llama...Mama Llama.
I created this step-by-step drawing tutorial in honor of Mother's Day, which will be on May 10, 2020. Llamas are popular right now. I've seen them on t-shirts, backpacks, and lunch boxes. Did you know llamas and camels are in the same family? It's like they're cousins. Llamas live in South America where some are wild and some live with people. So, if you're into llamas, here's an easy type to draw. Let's get busy drawing! Grab some paper and a pencil. Look in the top left corner on my paper. There's a curved line that looks like a letter C. Draw that. Follow the arrow to the right. Draw these 2 straight lines for the neck. 1 line is a diagonal (remember? diagonals are slanted) and the other is a vertical (remember? up and down). Follow the arrow. Draw the lines for the rest of the body. Another arrow to the right. Now, draw the ears, tail, and legs. Last arrow. Finally, add the details: inner ear lines, closed eye with lashes, nose and mouth lines, halter (that what some llamas wear on their head, like a horse does), hoof lines, and a fancy blanket (some camels wear blankets, too). Now you can add other details if you want. Since this was a Mother's Day idea, I drew a baby llama. Look, do you see those short, curved lines by their tails? Those are called action lines and they show that the 2 llamas are wagging their tails. Cute, huh? Also, I drew thought bubbles. Those are the cloud shapes by their heads. See the small circles going towards their heads? Those show what the llamas are thinking of. I'm sure you know what the hearts inside the bubbles mean! I used colored pencils on my llamas, but you could use crayons or markers instead. Happy Mama Llama Day! Hey, that rhymes! Mama Llama...Mama Llama...Mama Llama.
